AccurateTax for WooCommerce Documentation
Table of Contents
Introduction
AccurateTax for WooCommerce allows online retailers to accurately calculate and charge sales tax on all orders shipped within the United States. The AccurateTax plugin for WooCommerce looks up the correct sales tax rate(s) for the order based on the address and the items in the order, and calculates the tax amount, adding it as a sales tax charge to the customer’s order. The solution consists of a plugin that is installed on the retailer’s WooCommerce store, and the centralized AccurateTax server-based application that is hosted on our systems.
For more information click here.
Installing the Plugin
Before installing the AccurateTax plugin in your store, you should have the following:
- A WordPress website running WooCommerce
- Login information to access the back end of the website as an administrator
- The ZIP file (woocommerce-accuratetax.zip) containing the plugin to be installed
- Your license key and checksum
- A list of the state(s) in which you have nexus
Once you have this information, proceed with the steps below to install and then configure AccurateTax in your WooCommerce store.
- Log into your WordPress back end as an administrator
- Hover over Plugins in the left column, and then choose Add New from the flyout menu
- Click the Upload Plugin button
- Click the Choose File button, and in the dialog, locate the woocommerce-accuratetax.zip file on your hard drive
- Click the Install Now button
- Click the Activate Plugin button
The AccurateTax plugin is now installed on your WooCommerce website. Next, you need to configure your settings.
AccurateTax for WooCommerce Settings
- In the left column of WordPress, hover over WooCommerce and choose Settings
- Make sure the “Enable tax rates and calculations” checkbox is checked. If not, check it, scroll to the bottom, and click the “Save changes” button.
- Either in the left column under WooCommerce, or in the tabs across the top on the WooCommerce Settings page, click AccurateTax.
- Enter your License Key, Checksum, and Service URL
- Check each of the states you wish to calculate sales tax for.
- Check the Enable box. Leave the other two boxes unchecked unless you wish to turn on debugging and/or turn off caching.
- Scroll to the bottom and click the “Save changes” button.

Creating a Default Product Tax Class
In your AccurateTax account, you will need to create a product tax class called “default”. To do so:
- Log into your AccurateTax account, which is separate from your WooCommerce login
- Go to Settings > Tax Classes
- Click the “New Tax Class” button
- Enter “default” (without the quotes) in both boxes, then click the Create button
- In the Store Tax Classes list, you should now see an entry for “default”. Click that line.
- On the right side, under AccurateTax Tax Sku, choose any state, it doesn’t matter which one.
- In the Available Mappings dropdown, find the entry for Default > Taxable Goods, and click that line.
- Then click the Assign to All States button.
Creating a Shipping Tax Class
You will also need to create a separate tax class for shipping charges, in both WooCommerce and in your AccurateTax account:
- Log into your WordPress site’s admin
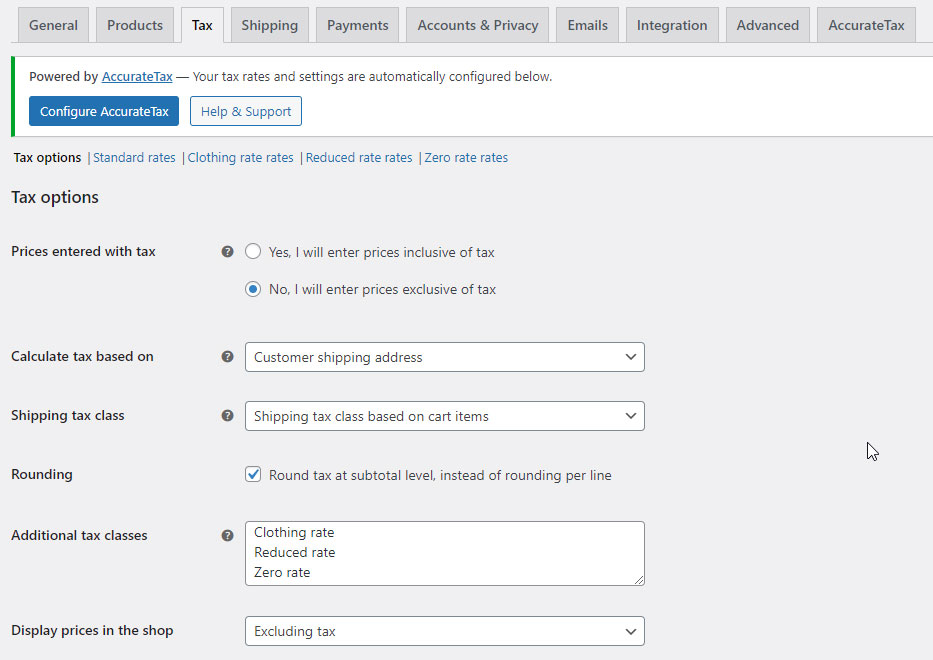
- Under WooCommerce Settings, click the Tax tab
- The Additional tax classes box lists all your defined tax classes. To add a new one, place your cursor in the box, click the Enter key to get a new line, and type “Shipping” for the class name.
- When you have finished adding tax classes, scroll to the bottom and click the “Save changes” button.
- Once the page reloads, on the same page, look for the line labeled “Shipping tax class”. Change the value to “Shipping”.
- Log into your AccurateTax account, go to Settings > Tax Classes, add the Shipping to the Store Tax Classes list, then map it to all states. (See detailed instructions under “Creating a Default Product Tax Class” above.)

Creating Additional Tax Classes (Optional)
If you need additional tax classes, such as for apparel, medical equipment, or food, follow these steps to add them to WooCommerce. Note that the tax classes entered into here will also need to be entered into your AccurateTax account on the Settings > Tax Classes screen. This should be added in AccurateTax for each state. Additional details can be found in the “Tax Class Mapping Instructions.pdf” document linked on the main screen of your AccurateTax account.
- Under WooCommerce Settings, click the Tax tab
- The Additional tax classes box lists all your defined tax classes. To add a new one, place your cursor in the box, click the Enter key to get a new line, and type in a tax class name. Continue adding classes, one per line.
- When you have finished adding tax classes, scroll to the bottom and click the “Save changes” button.

You also need to set the appropriate products to use your new tax classes. To do so:
- Edit a product by clicking Products in the left column, then for the product you want to use a different class, click the Edit link when you hover over the product.
- Scroll to the Product Data section. Make sure Tax Status is set to Taxable, and in the Tax class dropdown, choose the appropriate class from those you created above.
- Scroll up and click the “Update” button in the right column

Testing the AccurateTax Plugin
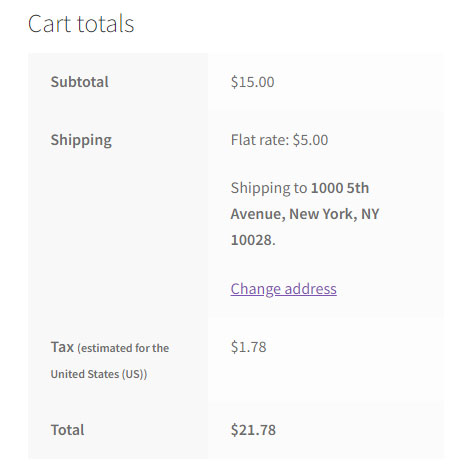
To test the AccurateTax WooCommerce Plugin, open your store and add one or more taxable products to your shopping cart. Set your address to a valid address for taxable state. You should see a Sales Tax charge.

A developer or other technical resource may also find the debug logs useful, if enabled. They can be found at in the “/wp-content/uploads/wc-logs” directory and begin with “accuratetax”.
Please also take a look at our Frequently Answered Questions.
