AccurateTax for Miva Merchant Documentation
Table of Contents
Introduction
AccurateTax is a product that allows online retailers to accurately calculate and charge sales tax on all orders shipped within the United States. The Enterprise version of AccurateTax scrubs and validates the shipping address, looks up the correct sales tax rate(s) for the order based on the address and the items in the order, and calculates the tax amount, adding it as a sales tax charge to the customer’s order. The solution consists of a Miva Merchant module that is installed on the retailer’s store, and the centralized AccurateTax server-based application that is hosted on our systems.
Installing the Module
Before installing the AccurateTax module in your store, you should have the following:
- A Miva Merchant store and the login information to access the administration utility
- The ZIP file containing the module to be installed
- Your license key and checksum
- Knowledge of the state(s) in which you have nexus
- Knowledge of whether you wish to scrub all addresses, or just those for taxable orders
Once you have this information, proceed with the steps below to install and then configure AccurateTax in your Miva Merchant store.
- Unzip at_enterprise_5.zip to your hard drive
- Log into your Miva Merchant back end administration utility
- Click Settings in the lower left corner of the Miva admin, and then click Domain Settings
- Click the Modules tab
- Click the “Add Module” button in the upper right corner
- Click the Upload button. A popup window will appear.
- Use the popup window to upload accuratetax_enterprise.mvc to your server.
- Click the “Upload” button on the popup window
The AccurateTax module is now installed on your Miva website. Now you need to set your store to use it.
Setting Your Store to Use AccurateTax
- Click Settings in the lower right corner of the Miva admin, and choose Store Settings
- Scroll down to the Settings section. Change the Sales Tax Calculation dropdown to choose AccurateTax Enterprise
- Click the Update button in the upper right corner
- Miva Merchant will warn you that you will lose your settings for the existing tax module. You must allow this to happen in order to proceed with installation. To do so, click the OK button in the popup warning.
- After switching your store to use AccurateTax Enterprise, a new tab will appear labeled “AccurateTax Enterprise”. Depending on your store and your monitor resolution, you may have to click the “More” button.
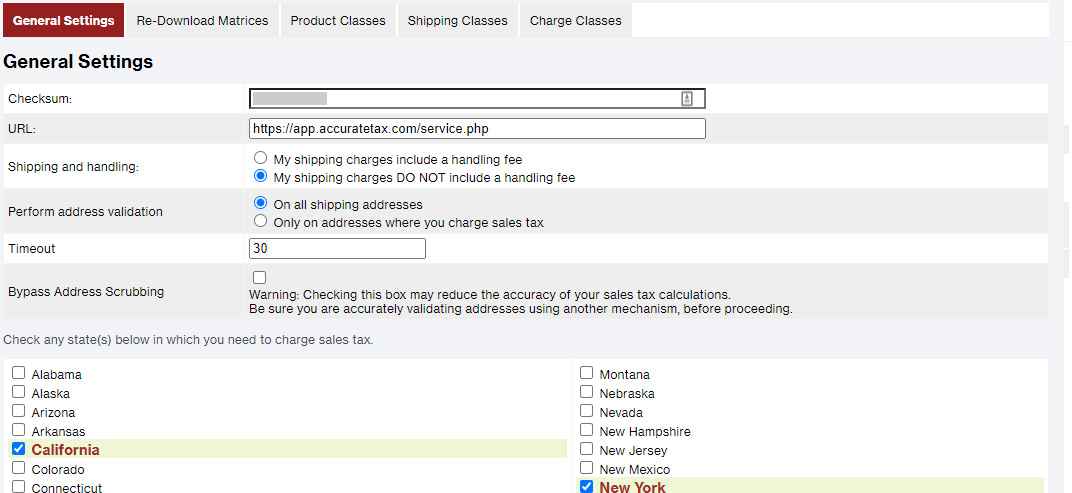
Global Settings
- Click the new tab labeled AccurateTax Enterprise (it may be under the “More” button).
- Enter your license key and click the Update button. When the screen refreshes, you should see a message that says License Accepted at the top. You may also see a warning if the module was unable to automatically create the ATADDR page. There is no need to worry about the warning at this point; the ATADDR page is discussed in the Address Validation Screen section of this document.
- Fill in the appropriate fields as follows:
- Checksum – enter the checksum provided to you by AccurateTax
- URL – should be https://app.accuratetax.com/service.php unless otherwise advised by AccurateTax
- Shipping and handling – choose the radio button that corresponds to your store’s shipping charges. If you add a handling fee onto your shipping charges and they are combined into a single charge in your shopping cart, choose the first button. If you do not charge handling, or if you charge handling but it’s a separate line item in your shopping cart, choose the second button.
- Perform address validation – choose the radio button to indicate whether you’d like to scrub and validate all shipping addresses, or only the addresses in states where you have nexus. Scrubbing all addresses will give you cleaner shipping data for your orders, but it will result in a greater number of calls to our server.
- Timeout – Usually the default of 30 (seconds) is fine, but if you’re advised to increase or decrease the timeout, you can change this value.
- Bypass Address Scrubbing – If you wish to bypass the address scrubbing feature of the module, as well as the ATADDR screen, you can check this box. However, please be aware that submitting non-verified addresses may result in inaccurate tax calculations. Generally you will only check this if you have some other address validation service on your website. Use this option with caution.
- States – check the box next to each state in which you have nexus, or a business presence that requires you to collect sales tax. If you need help determining nexus, contact your legal counsel or accountant.
- Click the Update button.
Download Matrices
After you’ve installed the module for the first time, you’ll need to download the taxability matrices from the AccurateTax server. This generally only needs to be done once (though there is the capability to redownload them should states ever decide to change their matrix codes). To do so, you will click the maroon “Download Matrices” sub-tab on the AccurateTax module’s administration page. Then, simply click the “Update” button in the upper right corner, and the matrices will be downloaded into your local database.
Please allow enough time for the data to be downloaded. Once it has finished, the screen will refresh and instead of the two sub-tabs shown before (“General Settings” and “Download Matrices”) , you will now see five sub-tabs (“General Settings”, “Re-Download Matrices”, “Product Classes”, “Shipping Classes”, “Charge Classes”).
Product Classes
In your store, you need to indicate the tax class for your products. Certain states have different taxes on different products – for example, clothing and food may be taxed differently from other products. To begin this process, you need to set the default product tax class for your entire store. After doing so, you can set the tax class for individual products if they differ from your default product tax class.

Default Product Classes
- Click the Product Classes sub-tab.
- Next you need to enter one default product class for each state in which you’re charging sales tax (as determined by the state checkboxes on the main General Settings sub-tab). To add a new default product tax class, fill in the following fields:
- Choose a State: Select a state from the dropdown
- Choose a Category: Select a category from the dropdown. The dropdown will be empty until you select a state from the dropdown above.
- Choose a Subcategory: Select a subcategory from the dropdown. The dropdown will be empty until you select a state and a category from the dropdowns above.
- Give it a Nickname: This is optional, but if it helps you remember the tax classes based on your own naming conventions you may enter a nickname here.
- Click the Update button to add this tax class to the table.
- Repeat as needed for all other states in which you charge sales tax. There should be exactly one default product tax class for each state in which you charge sales tax.
Product Class Overrides
Certain products may need to be assigned a different product tax class than the default class for the rest of your store. To set the product tax class for an individual product, edit the product within Miva Merchant:
- Click the Catalog link on the left side of the Miva admin
- Browse or search for the product whose tax class you wish to set individually
- Hover over the product until the edit button appears, and then click the Edit button. It has a square with a diagonal arrow icon, as shown in this image below:
- Click the AccurateTax Tax Class Override tab. This may be hidden behind the “More” button; if so, click that button and then choose the tab name.
- You may enter a specific tax class for one or more states in which you charge sales tax:
- Choose a State: Select a state from the dropdown
- Choose a Category: Select a category from the dropdown. The dropdown will be empty until you select a state from the dropdown above.
- Choose a Subcategory: Select a subcategory from the dropdown. The dropdown will be empty until you select a state and a category from the dropdowns above.
- Give it a Nickname: This is optional, but if it helps you remember the tax classes based on your own naming conventions you may enter a nickname here.
- Click the Update button
You may choose to override the tax classes for all states or just certain ones. If a given product doesn’t have its own product tax class for the state the order is being shipped to, the system will use the default product tax class from the AccurateTax Default Product Tax Classes screen.
Shipping Classes
Shipping charges in your store need to be assigned a tax class in the same manner as products. To do so, go back to the main tabs by clicking the Settings button and choosing Store Settings. From there:
- Click the AccurateTax Enterprise tab (which may be hidden behind the “More” button)
- Click the Shipping Classes sub-tab
- Next you need to enter one default shipping tax class for each state in which you’re charging sales tax (as determined by the state checkboxes on the General Settings sub-tab). To add a new default shipping tax class, fill in the following fields:
- Choose a State: Select a state from the dropdown
- Choose a Category: Select a category from the dropdown; typically it will be described as delivery or postage charges. The dropdown will be empty until you select a state from the dropdown above.
- Choose a Subcategory: Select a subcategory from the dropdown. The dropdown will be empty until you select a state and a category from the dropdowns above.
- Give it a Nickname: This is optional, but if it helps you remember the tax classes based on your own naming conventions you may enter a nickname here.
- Occasionally a certain shipping method (such as in-store pickup) may need a different class. If so, you can select that on a method-by-method basis under the section Override Tax Class for Individual Methods. If your store doesn’t need this, leave them all as “Use Default”.

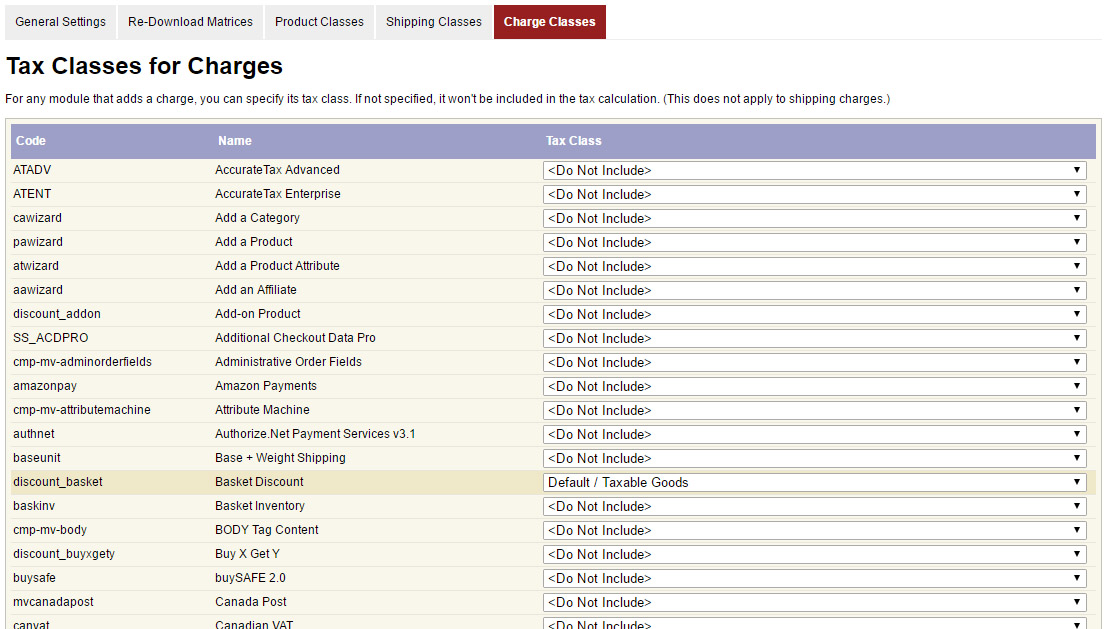
Charge Classes
Some charges should affect sales tax, and some shouldn’t. For example, shipping-related charge, such as lift gate service or residential delivery, may need to be charged as a shipping service. If this is the case, you’ll want to set the tax class for these charges. This is done on a module-by-module basis from the Charge Classes sub-tab.
Let’s say you have a custom shipping module that may enter a charge for lift-gate service, and you want to make sure this is included appropriately. In this case, you would find the custom shipping module in the list of modules, and change its dropdown menu to the appropriate class, and then click the Update button. An example is shown below:
Address Validation Screen
During checkout, customers with addresses that need to be scrubbed and validated (based on your settings) will see an extra screen after entering their address. This screen needs to be setup in your store. During installation, the module attempted to automatically create the Address Validation page. If it was successful, you will see a page with the code ATADDR in the Pages section of your Miva Merchant backend. If the page was not automatically created, you may do so manually.
To Manually Create the ATADDR Page
- Click the Menu button, then choose User Interface.
- Search for the page with the code ATADDR. If it exists, you do not need to manually create it. If it does not, continue with these instructions.
- Click the “+” button to add a new page.
- Enter ATADDR for the code, AccurateTax Address Validation as the name (you may modify this if desired) and in the template box, enter the code from one of the following two files that came with your module.
- If your store uses a ReadyTheme, copy the template code from the file readytheme_ATADDR.mvt into the template box.
- If your store does not use a ReadyTheme, copy the template code from the file cssui_ATADDR.mvt into the template box.
- Click the Add button.
If Your ATADDR Page Already Exists
If your ATADDR page already exists, or after you’ve added it, you may modify the HTML for the
template, as long as you don’t change the forms and their input tags in the template. You may also assign any additional items as needed.
Testing Your AccurateTax Module
To test your configuration, go to your storefront and add at least one taxable product to your shopping cart. Begin the checkout process, and make sure to enter a US-based address in one of the states you assigned as a taxable state in General Settings above.
Once you’ve entered your shipping and billing addresses, when you click the Continue button, you should see the new ATADDR screen. It should look something like the screenshot below, although the formatting of the page around the addresses may differ if you’ve customized your global header/footer or the ATADDR page itself.
In certain cases, there may be multiple addresses under the Recommended column. Click the Use this Address button under any address in the Recommended column to continue to the normal Shipping and Payment Selection (OSEL) screen. On that screen, you should see the scrubbed address in the Ship To column. Scrubbed addresses always use all capital letters and have a 9-digit ZIP Code.
Choose any payment and shipping options, then click the continue button to proceed to the Order Payment Information (OPAY) screen. There you should see a sales tax charge in your shopping cart.
At this point, once you see the sales tax charge, your sales tax module is working.
A Note about Orders Entered in the Miva Admin
If you enter orders in the Miva administration dashboard, those orders will not automatically be committed. This means that AccurateTax doesn’t include them in data and reports for filing and reconciliation, because we don’t know that they are completed orders. The reason for this is that in the admin, Miva doesn’t automatically call their FulfillmentModule_Process_Order function, like they do when the order is placed on the website.
To make sure orders are marked as committed, once the order is finished, you need to click Order Fulfillment Modules in the top left above the Ship To section. This will open a popup with a list of fulfillment modules, including AccurateTax. Check the checkbox under the Process column next to the AccurateTax module, then click the Process button.
This will send the commit message from Miva to AccurateTax, so we know to include the order in your reports.