
AccurateTax for Magento Documentation
Introduction
AccurateTax is a product that allows online retailers to accurately calculate and charge sales tax on all orders shipped within the United States. It scrubs and validates the shipping address, looks up the correct sales tax rate(s) for the order based on the address and the items in the order, and calculates the tax amount, adding it as a sales tax charge to the customer’s order. The solution consists of a Magento extension that is installed on the retailer’s store, and the centralized AccurateTax server-based application that is hosted on our systems.
Before You Start
You will need the following items. Missing any one of them is the most common cause of a failed setup.
- Admin access to your Magento store, and either SSH access to the server or a developer who has it. The extension is installed from the command line. It cannot be installed from the Magento admin.
- Your AccurateTax license key and checksum. These come with your AccurateTax account.
- Your Magento Marketplace access keys, both public and private. To find them, click your account name at the top right of the Marketplace site, choose My Profile, then Access Keys on the Marketplace tab. Composer asks for them during installation.
- A list of the states where you have nexus.
- Your store’s physical origin address, meaning the warehouse or location you ship from.
Take a backup before you begin, and put the store into maintenance mode for the installation:
bin/magento maintenance:enableInstalling the Extension
Option A: install from Commerce Marketplace with Composer
This is the recommended route. Get the extension from the Commerce Marketplace listing first.
Confirm your composer.json contains the Magento repository:
"repositories": [
    {
        "type": "composer",
        "url": "https://repo.magento.com/"
    }
]
Require the package. Composer prompts for your Marketplace public key as the username and your private key as the password:
composer require accuratetax/tax:2.3.1Confirm Composer found it:
bin/magento module:status AccurateTax_TaxEnable it, then register and compile:
bin/magento module:enable AccurateTax_Tax --clear-static-content
bin/magento setup:upgrade
bin/magento setup:di:compile
bin/magento cache:clean
If your store runs in production mode, also run:
bin/magento setup:static-content:deployConfirm the module is now enabled:
bin/magento module:status AccurateTax_TaxThe output must report the module as enabled. If it reports the module as disabled, or does not list it at all, stop here. Nothing in the rest of this guide will work until this command succeeds.
Option B: install from a package supplied by AccurateTax
If AccurateTax has sent you a zip file rather than a Marketplace purchase, unpack it so that the module files sit at this path, creating the folders if they do not exist:
app/code/AccurateTax/Tax/registration.php and composer.json must sit directly inside that folder, not in a further subfolder. Then run the same sequence:
bin/magento module:enable AccurateTax_Tax --clear-static-content
bin/magento setup:upgrade
bin/magento setup:di:compile
bin/magento cache:clean
bin/magento module:status AccurateTax_Tax
After either option
Take the store out of maintenance mode:
bin/magento maintenance:disableSetting your store origin address
AccurateTax needs the address you ship from as well as the address you ship to. Several states tax based on the origin of the shipment, so an incorrect origin produces an incorrect rate.
Go to Stores, Settings, Configuration, then in the left panel expand Sales and choose Shipping Settings. Expand the Origin section and complete every field:
- Country
- Region/State
- ZIP/Postal Code
- City
- Street Address
Click Save Config.
AccurateTax Settings
Go to Stores, Settings, Configuration, then in the left panel expand Sales and choose Tax. Scroll down to the AccurateTax Settings section and expand it.
| Field | What to enter |
| Enable Module | Yes |
| License Key | The license key from your AccurateTax account |
| Checksum | The checksum from your AccurateTax account |
| AccurateTax States | Every state where you have nexus |
| Send Customer Groups | See the warning below |
| Service URL | Leave at https://us1.accuratetax.com/service.php unless AccurateTax tells you otherwise |
| Enable Logging | Yes while you are setting up |
| Logging Level | Debug while you are setting up |
Click Save Config.
Important: Send Customer Groups and guest checkout. AccurateTax only calculates tax for the customer groups selected here. Any group left unselected is skipped silently, with no error and no warning, and the order gets whatever tax Magento worked out on its own, which is usually zero.
Guests are their own group, called NOT LOGGED IN. If you do not select NOT LOGGED IN, every guest order in your store is charged no sales tax. Most stores should select every group in the list.
If you are an SST customer, select all groups including exempt ones, and have AccurateTax set up the customer exemptions on your account.
Note on the states list. Alaska and Hawaii are not offered in the AccurateTax States list, and neither are US territories such as Puerto Rico and Guam, or Armed Forces addresses. If you have nexus in a state that is not listed, contact AccurateTax.
Note on Logging Level. Enable Logging on its own is not enough. If Logging Level has never been set and saved, no log file is written at all. Set the level explicitly.
Product Tax Classes
Every product must have a tax class assigned, and that tax class must also be mapped in AccurateTax as described in section 7.
Open a product in Catalog, Products and check the Tax Class field. The Magento default is Taxable Goods. Whatever value you use, note it down exactly as it is spelled, because you will type it into AccurateTax in section 7.

Next you must follow the Tax Class Mapping instructions within the AccurateTax interface.
Shipping Tax Class
Go to Stores > Settings > Configuration > Sales > Tax and expand the Tax Classes section. Set Set Tax Class for Shipping to a tax class appropriate for shipping. Note the exact name, because this one also has to be mapped in AccurateTax in section 7.
Click Save Config.

Adding Your Magento Tax Classes to AccurateTax
Any tax class you use in Magento, for products or for shipping, must also exist in your AccurateTax account and be mapped to a state. Unmapped classes are not taxed correctly.
- Log in to your AccurateTax Account
- Navigate to the Settings > Tax Classes tab.
- Under the Store Tax Classes List, Click the button Labeled “New Tax Class”
- For both the Tax Class Name and Tax Class Code field enter the tax class as it appears in your store.
- Click the button labeled “Create”.
- Under the Store Tax Classes list click the newly created Store Tax Class.
- On the right side under AccurateTax Tax Sku, select a state from the drop-down list.
- Under the Available Mappings drop-down select an appropriate mapping.
- Click the button labeled Assign or if you wish this mapping to be assigned to all states click the button labeled “Assign to All States”
Please note: assignments are saved, but do not currently show on this screen. If you are mapping multiple states to a single tax class, such as adding Apparel Items for NY and FL, you will need to create separate mappings, i.e. repeat steps 7-8 for each state.
This should be done for all your Product Tax Classes as well as any Tax Classes that are used for Shipping.
The next two steps (Setting Up Tax Zones and Rates as well as Setting up Tax Rules are both optional, and these will act as a fallback rate incase your site is unable
Fallback tax rates
This section is optional but recommended.
Tax zones and rates
If AccurateTax cannot be reached, the extension does not block checkout and it does not guess. The order falls back to whatever Magento itself would have charged. If you have no Magento tax rules set up, that means no tax is charged on those orders.
Setting up native Magento rates gives you a safety net. Skip this only if you accept that risk.
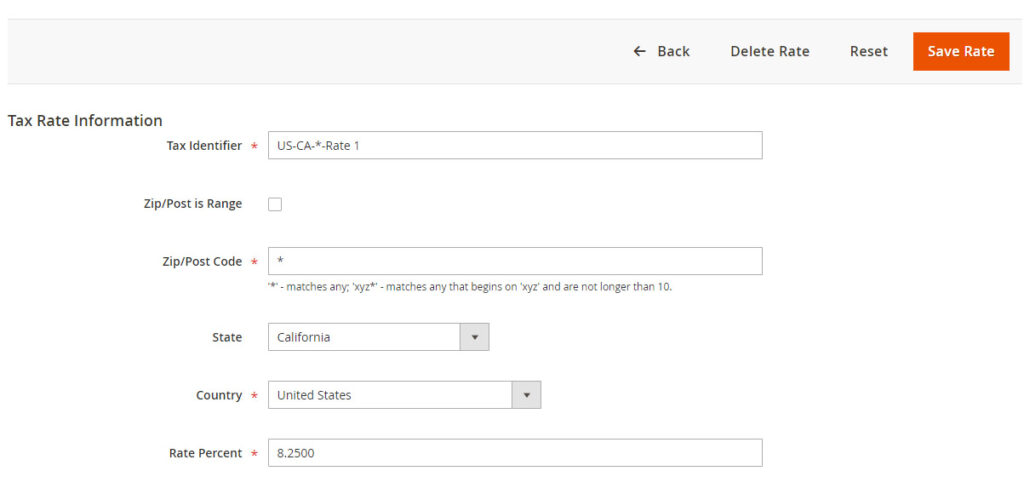
- In the Magento administration, go to Stores > Taxes > Tax Zones and Rates
- Create a zone for each state you wish to collect sales tax for. To do so, click the “Add New Tax Rate” button.
- Complete the fields as follows:
- Tax Identifier can be any unique name that helps you understand what it refers to. For example, “US-CA”
- Leave Zip/Post is Range unchecked
- Zip/Post Code should have a value of “*”
- Set the State dropdown to the state you’re setting a zone for
- Set the Country dropdown to United States
- Rate Percent should be set to a default fallback rate to use for the state, in case the call to AccurateTax fails
- Click the “Save Rate” button.
- Repeat steps 2-4 for all taxable states.
Tax Rules
Once you have your zones and rates created you will need to create rules. Rules assign the Zones and Rates in Magento to Tax Classes.
- In the Magento administration, go to Stores > Taxes > Tax Rules
- Click the “Add New Tax Rule” button in the upper right corner
- Complete the fields as follows:
- Name: Use any name you wish.
- Tax Rate: In most scenarios, you will check all tax rates to apply this rule to them
- Optional: If you need to apply this rule to unique customer or product tax classes, click the down-facing arrow to the right of Additional Settings
- Customer Tax Class: In most cases, this will be Retail Customer. Click to change it to a different customer tax class as needed.
- Product Tax Class: In most cases, this will be Taxable Goods. Click to change it to a different product tax class as needed.
- Note: In most stores, only one tax rule is needed.
- Click the “Save Rule” button in the upper right corner.


Testing Your AccurateTax Extension
Test the tax calculation
To test your configuration, go to your storefront and add at least one taxable product to your shopping cart. Begin the checkout process, and make sure to enter a US-based address in one of the taxable states you configured in your store.
Once you reach the Review & Payments screen of your Magento checkout, you will see sales tax in the cart summary, typically on the right side of the page as shown below.

Test the order commit
Calculating tax at checkout and reporting the order to AccurateTax are two separate things. An order is only reported once it reaches a state of Complete or Closed.
1. Place a test order.
2. In the Magento admin, invoice it and ship it in full, so the order state becomes Complete.
3. Log in to your AccurateTax account and go to Reports, Orders. The order should be listed.
An order is only reported if all five of the following are true. If any one of them fails, the order is skipped and nothing is reported.
- The order state is Complete or Closed. An order sitting in Processing has not been reported yet.
- The order currency is USD.
- The shipping address country is US, or for a virtual order, the billing address country is US.
- The customer group is selected in Send Customer Groups.
- The shipping state is selected in AccurateTax States.
The same five conditions apply to credit memos.
Troubleshooting
No tax is being charged at checkout
Work through these in order. All of them fail silently, so the storefront simply shows no tax.
1. The customer group is not selected. Check Send Customer Groups. For a guest order the group is NOT LOGGED IN. This is the most common cause by a distance.
2. The state is not selected. The shipping state must appear in AccurateTax States. Note that Alaska, Hawaii and the US territories cannot be selected.
3. License key or checksum is blank or wrong. Both are required. Recheck them against your AccurateTax account.
4. The shipping postcode is not a valid US postcode. The extension validates the postcode against Magento’s own postcode patterns before calling AccurateTax.
5. The product has no tax class, or the tax class has not been created and mapped in AccurateTax. See sections 5 and 7.
6. The store origin address is incomplete. See section 3.
Tax is charged at checkout but the order never appears in AccurateTax
Check the five conditions in section 9 under Test the order commit. In practice the usual cause is that the order is still in Processing because the payment has not been fully captured, or because the order has been only partially invoiced or partially shipped.
If the order state is Complete and it still has not appeared, check Send Customer Groups and AccurateTax States. Those two settings gate the reporting step as well as the checkout calculation, so changing them after an order was placed can stop that order being reported.
The log file is empty or does not exist
Set both Enable Logging to Yes and Logging Level to Debug or Verbose, then save. Logging Level has no default, so a store that has never saved that field writes nothing at all.
The log folder is created the first time something is written to it, so an absent folder usually means nothing has been logged yet rather than a permissions problem.
If Magento reports that it could not write to the log directory, check that var/log is writable by the web server user.
Log files
With logging enabled, the extension writes to two files:
| File | Contains |
| var/log/AccurateTax/AccurateTax.log | Tax requests and responses at checkout, and invoice tax adjustments |
| var/log/AccurateTax/AccurateTax_Commits.log | Orders and credit memos reported to AccurateTax |
Both sit in an AccurateTax subfolder of your Magento log directory, not in the log directory itself.
The Logging Level setting controls how much is written:
| Level | Use |
| Info | Normal running. Records requests sent and successful responses. |
| Debug | Setting up and troubleshooting. Adds the reasons a call was skipped. |
| Verbose | Deep troubleshooting. Adds line by line item matching detail. |
Turn logging down to Info once the store is live and working. Verbose logging on a busy store produces very large files.